
An organized pantry is a game-changer for any kitchen, making cooking more efficient and grocery shopping easier. By categorizing pantry items into these common groupings, you can quickly find what you need and keep better track of your supplies.
Baking Items
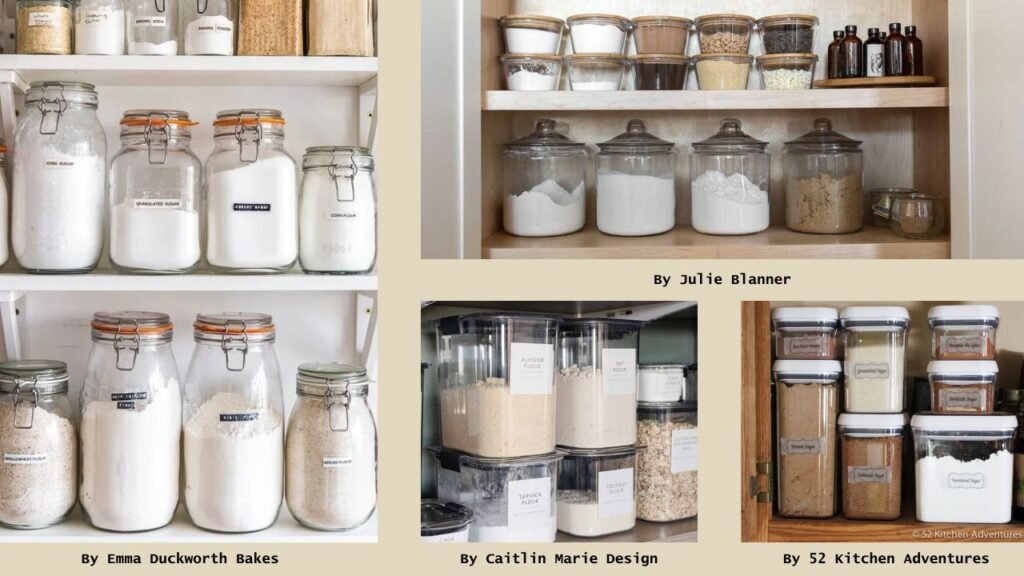
This group includes all items you use primarily for baking, such as flour, sugar, baking soda, baking powder, cocoa powder, various flours (e.g., almond, coconut), and baking mixes.
Storage Tips
- Use Clear, Airtight Containers: Transfer your flour, sugar, and other bulk ingredients into clear, airtight containers. This keeps them fresh longer and lets you see what you have and how much is left at a glance. Label each container with the ingredient name and the date you stored it.
- Stackable Bins and Baskets: Utilize stackable bins or baskets to group similar items together. You can have one for chocolate chips and candy decorations, another for nuts and dried fruits, and so on. This method makes it easy to pull out exactly what you need without rummaging through everything.
- Lazy Susans for Easy Access: A lazy Susan can be a baker’s best friend, especially for items like spices, baking powder, baking soda, and vanilla extract. Just spin it, and you have everything at your fingertips without moving other items around.
- Drawer Organizers for Small Tools: Use drawer organizers or small bins to organize baking tools like measuring spoons, cookie cutters, and icing tips. This way, they don’t get lost in the shuffle, and you can easily grab what you need.
- Hang It Up: If space allows, use hooks or over-the-door organizers to hang items like measuring cups, aprons, and oven mitts. This keeps them out of the way but still easy to access when you’re in the middle of a baking spree.
- Use Vertical Space: Install shelves or stackable shelf organizers inside your pantry to maximize vertical space. You can store less frequently used items like special occasion baking molds or extra supplies on the higher shelves.
- Dedicate a Baking Zone: If you have the space, dedicate a specific area of your pantry or a particular cabinet as your “baking zone.” Having everything in one place makes it so much easier when you’re ready to start mixing and kneading.
Cereals and Breakfast Items
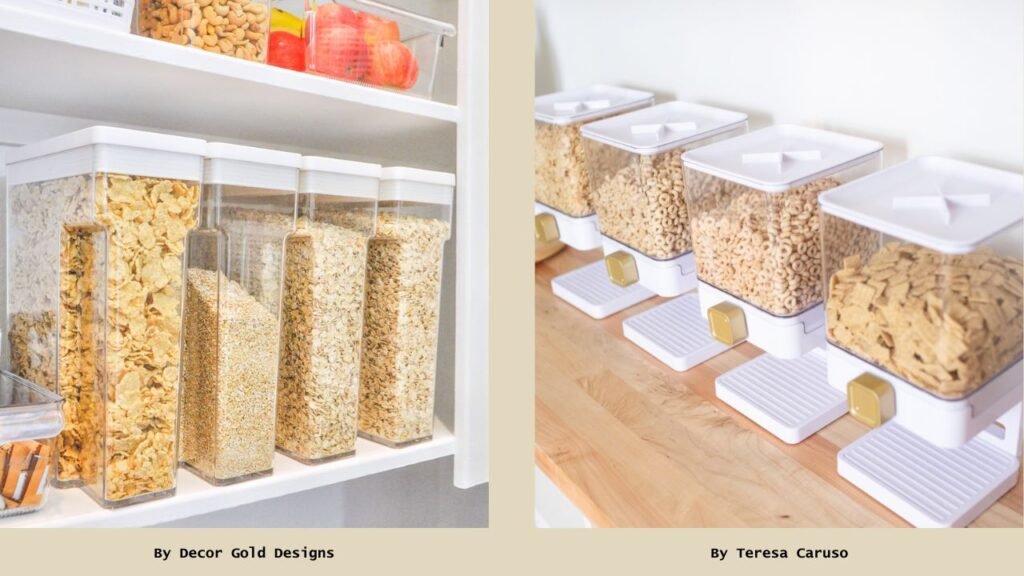
Here, you can store cereals, oatmeal, granola, breakfast bars, and other related items that are typically consumed in the morning.
Storage Tips
- Use Clear, Airtight Containers: Store cereals in clear, airtight containers to maintain freshness and make it easy to see what you have. Label each container with the cereal type and the date it was opened.
- Cereal Storage Dispensers: Consider using cereal dispensers for your favorite cereals. These dispensers are great for maintaining freshness and making pouring simple and mess-free, especially for kids in the morning.
- Designate a Breakfast Shelf: Allocate a specific shelf or section in your pantry exclusively for breakfast items. This keeps all your cereals, oats, and granolas in one convenient place.
- Utilize Baskets or Bins: Group smaller items like granola bars, instant oatmeal packets, and breakfast bars in baskets or bins. This helps prevent them from getting lost among larger items and makes it easy to grab and go.
- Lazy Susan for Spreads and Toppings: Place a lazy Susan in your pantry for jars of nut butters, honey, and other spreads or toppings. This makes finding and using them easy without moving other items around.
Canned Goods
Include all types of canned products such as vegetables, fruits, beans, soups, and stocks. This category might also extend to jarred items like sauces and pickles.
Storage Tips
- Use Tiered Shelves: Install tiered shelves or can risers in your pantry. These allow you to see all your cans at once, preventing any from being hidden in the back.
- Can Rack Organizers: Utilize can rack organizers to automatically rotate your stock using a “first in, first out” system. These racks keep your cans organized and easily accessible, maximizing vertical space.
- Lazy Susan for Accessibility: Place a lazy Susan in a corner of your pantry or cabinet. This is perfect for storing canned goods you use regularly, making them easy to access with a simple spin.
- Categorize and Group: Organize cans by type — like vegetables, fruits, soups, and sauces. Grouping similar items together makes it easier to find what you need without searching through every can.
Spices and Herbs
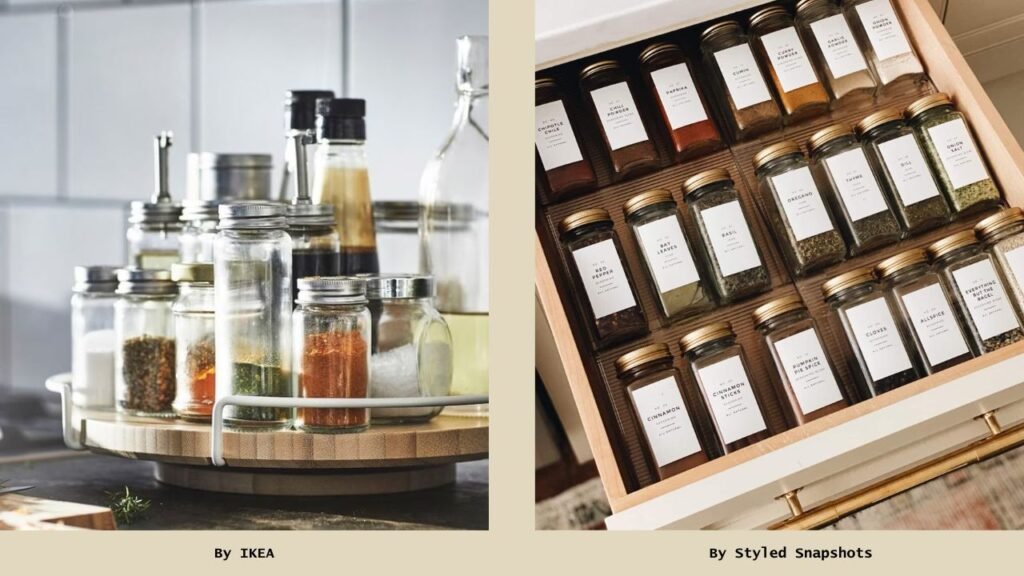
A crucial category that includes all your dried spices, herbs, and seasoning blends.
Storage Tips
- Use Spice Jars: Transfer your spices and herbs into uniform spice jars to keep your storage looking neat and tidy.
- Lazy Susan for Easy Access: Place a lazy Susan in your pantry or on your counter. This rotating tray is perfect for storing frequently used spices and herbs, allowing you to easily find and reach what you need with a simple spin.
- Magnetic Spice Racks: Use magnetic spice containers that can stick to a metal surface or a wall-mounted magnetic board. This saves counter and cabinet space and keeps your spices in clear view.
- Drawer Organizers: If you prefer to keep spices out of sight, use shallow drawer organizers. Lay your spice jars flat with labels facing up for easy identification.
- Tiered Spice Racks: Install tiered spice racks inside your pantry or cabinet doors. These racks make use of vertical space and allow you to see all your spices at once without needing to move others out of the way.
- Wall-Mounted Racks: If you have free wall space, install small rácks to hold your spices. This keeps them off the counter and makes them easily accessible.
- Store in a Cool, Dark Place: Keep spices and herbs away from heat, moisture, and direct sunlight to preserve their flavor and extend their shelf life.
Snacks
This group contains all kinds of snacks like chips, nuts, popcorn, crackers, and dried fruit. It’s often helpful to keep snacks together so you can easily find something quick to eat.
Storage Tips
- Use Clear Bins: Store snacks in clear, labeled bins to easily see what’s inside without rummaging through everything. This is great for grouping similar snacks together, like chips in one bin and cookies in another.
- Hanging Snack Baskets: If you’re short on shelf space, use hanging baskets or over-the-door organizers for storing snacks. This utilizes unused vertical space and keeps snacks out of the way but easily accessible.
- Drawer Dividers: If you have drawer space available, use drawer dividers or shallow bins to separate snacks. This works well for individually packaged items like granola bars or fruit snacks.
- Tiered Shelves: Install tiered shelves in your pantry to maximize vertical space. This way, you can place snacks on different levels and easily see everything at a glance.
- Mason Jars for Bulk Snacks: Use large mason jars or airtight containers for bulk items like pretzels or popcorn. They keep snacks fresh, and you can easily see them when running low.
- Repackage in Serving Sizes: Repackage bulk snacks into individual servings using zip-top bags or small containers. This helps with portion control and keeps the snacks from going stale once the original package is opened.
- Accessible Kids’ Snack Zone: Create a lower shelf or bin where kids can reach their favorite snacks. This encourages independence and makes it easier for little ones to help themselves.
Pasta and Grains

Store various types of pasta, rice, quinoa, barley, and other grains. You might also include related items like noodles and couscous here.
Storage Tips
- Tall, Square Containers for Efficient Storage: Utilize tall, square containers to maximize pantry space. These containers fit better on shelves and in corners, making use of vertical space while keeping contents like spaghetti and linguine upright and accessible.
- Stackable Bins for Bulk Storage: Use stackable bins with airtight seals to store bulk quantities of pasta and grains. This approach keeps them fresh and maximizes your pantry space by using vertical storage efficiently.
- Freezer-Safe Containers: For longer-term storage, especially for whole grains that can spoil faster, keep your pasta and grains in freezer-safe, airtight containers. This method extends their shelf life and maintains freshness until you’re ready to use them.
- Tiered Shelves to Maximize Space: Install tiered shelves in your pantry to maximize vertical space. Arrange different types of pasta and grains on various levels, making it easy to spot and retrieve what you need without rearranging everything.
- Mason Jars for Visibility: Use large mason jars or other clear, airtight containers for smaller items like lentils, quinoa, and couscous. They keep your grains fresh and let you quickly see when you’re running low.
- Repackage in Serving Sizes: If you often cook for one or two, repackage bulk pasta and grains into smaller, airtight containers or zip-top bags. This helps maintain freshness longer and aids in portion control.
- Pest-Proof Your Pantry: Ensure all pasta and grains are in secure, airtight containers to deter pests. Regular pantry checks and cleanings can help maintain a pest-free environment.
Oils and Vinegar

A smaller section usually suffices for bottles of cooking oils, vinegar, and other similar condiments that are used in cooking.
Storage Tips
- Dark Glass Bottles: They are best for oils and vinegar because they minimize light exposure, which can accelerate oxidation and spoilage. Ensure the bottles are tightly sealed to prevent air from entering, which can further degrade the products.
- Keep in a Cool, Dark Place: Store both oils and vinegar in a cool, dark cupboard, away from the stove and other heat sources. Heat, light, and air are the main enemies of oils and vinegar, leading to faster spoilage.
- Opt for a Lazy Susan: If you’re dealing with a deep cabinet, a lazy Susan can be a game-changer—it spins, so you can easily grab what you need without knocking over everything else!
- Avoid Plastic for Long-Term Storage: Use glass or metal containers for long-term storage, as plastic can interact with oils and sometimes affect flavors. Glass and metal are non-reactive and keep your oils and vinegar in their best condition.
- Accessible Cooking Zone: Think about keeping them together but separate, like having all your oils on one side and vinegar on the other. Also, organize your oils and vinegar by usage frequency, with those used most often at the front, to make them easily accessible and efficiently rotate stock.
Sauces and Condiments
This includes all types of sauces, marinades, and condiments like ketchup, mustard, soy sauce, and mayonnaise.
Storage Tips
- Avoid Heat and Light: Keep your sauces and condiments in a cool, dark place like a pantry or a cupboard, away from direct sunlight and heat sources. Heat and light can change the flavor and color of these products over time.
- Refrigerate After Opening: Most sauces and condiments need to be refrigerated once they’re opened. Make sure to read the label for storage instructions to keep them from spoiling prematurely.
- Easy Access: Use a lazy Susan or a turntable in your fridge or pantry to store sauces and condiments. This makes it easy to find what you need without moving everything around.
- Separate Savory and Sweet: Store savory sauces and condiments on one shelf and sweet ones on another. This helps prevent strong flavors from mingling where they shouldn’t.
- Avoid Cross-Contamination: Always use a clean utensil when scooping out sauces or condiments. This prevents bacteria from entering the container and extends the product’s life.
Beverages
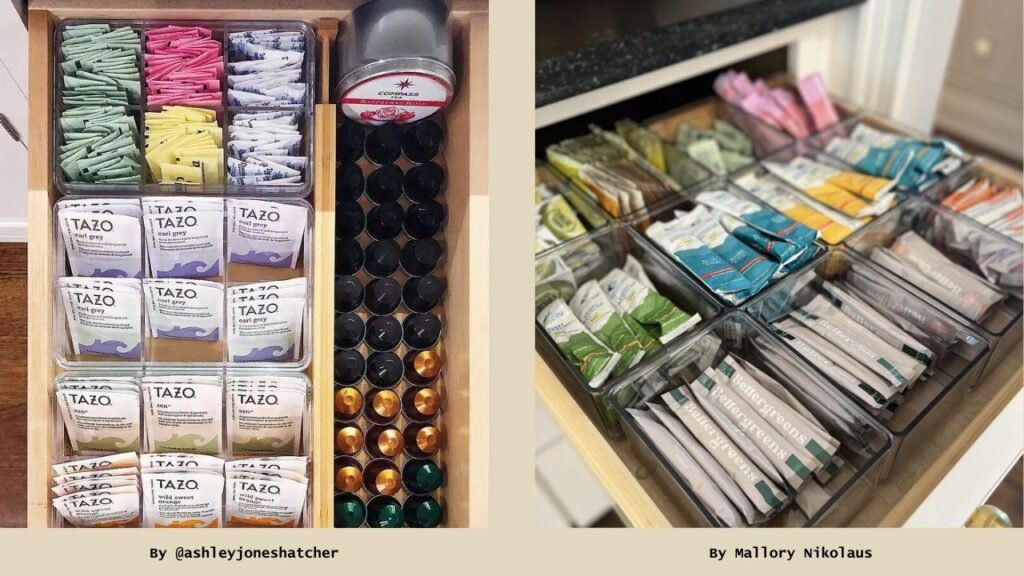
Tea, coffee, hot chocolate mixes, and any powdered drink mixes can be grouped here.
Storage Tips
- Dedicated Beverage Station: Create a dedicated section in your pantry. This streamlines your morning routine and keeps everything neat and accessible.
- Use Clear, Airtight Containers: Store each type of mix, in clear, airtight containers to keep them fresh and protect them from moisture and odors. This also makes it easy to see how much you have left without opening multiple boxes or bags.
- Tiered Shelving for Easy Access: Utilize tiered shelving within your pantry to arrange your beverage supplies. This setup lets you see all your options at a glance and easily reach everything.
- Small Baskets or Bins for Packets: Store single-serve packets or sachets of tea, instant coffee, or hot chocolate in small baskets or bins. This keeps them from getting scattered and makes it simple to grab one on the go.
Cooking Essentials
This broad category includes items like onions, garlic, potatoes, and other staples that don’t require refrigeration.
- Use Baskets for Ventilation: Remove them from plastic bags and store them separately in baskets to keep them contained and neat. Ventilation prevents moisture buildup, which can lead to spoilage. Mesh baskets or even slatted wooden crates are perfect for this purpose.
- Separate Apples and Bananas: Keep these staples away from fruits like apples and bananas that release ethylene gas, as this gas can cause vegetables to ripen and spoil more quickly.
- Dark, Cool, and Dry Storage Areas: Store these essentials in a dark, cool, dry place in your pantry or a dedicated storage area. Exposure to sunlight can cause potatoes to green and become bitter, while too much moisture can lead to mold or sprouting.
- Avoid Flavor Transfer: Store onions and garlic from potatoes in separate baskets or bins. Onions and garlic can impart strong flavors and moisture that may cause potatoes to spoil faster. Hang mesh bags or nets in a cool pantry to store onions and garlic. This keeps them off the ground, saves space, and allows excellent air circulation.
- Don’t Wash Before Storing: Don’t wash potatoes, onions, or garlic before storing them. Excess moisture can lead to decay. It’s best to store them in their dry, natural state and wash them just before use.
- Use Wooden Crates for Bulk Storage: If you buy in bulk, wooden crates are a great storage solution. They are sturdy, provide excellent ventilation, and can be stacked to maximize space.
Sweeteners
Separate shelf or area for honey, syrups, artificial sweeteners, and other sweetening agents.
Storage Tips
- Organize by Type and Usage: Keep all your liquid sweeteners (like honey and syrup) together and all your granulated or powdered sweeteners (like sugar and artificial sweeteners) grouped separately. Place sweeteners you use frequently at the front of the shelf or in an accessible area, and keep less commonly used sweeteners toward the back or on higher shelves.
- Use Airtight Containers: Store granulated sugars (white, brown, and powdered) in airtight containers to prevent them from hardening or clumping due to moisture. This is especially important for brown sugar, which can turn hard when exposed to air.
- Use Glass Jars for Syrups and Honey: Store honey, molasses, and liquid syrups in glass jars. Glass doesn’t absorb flavors and makes it easy to see how much you have left. Plus, these jars can be easily cleaned and reused.
- Dark and Cool Storage: Keep all sweeteners in your pantry in a cool, dark place. Direct sunlight and heat can alter the flavor and consistency, especially honey and syrups, which can crystallize or ferment if exposed to too much heat.
- Prevent Flavor Transfer: Store flavored syrups or infused sweeteners away from other pantry items that could absorb their flavors. For instance, vanilla sugar should be kept separate from regular sugar to maintain its distinct aroma.
- Use Lazy Susans for Small Containers: Place smaller containers of specialty sweeteners on a lazy Susan. This makes rotating and finding what you need simple without rearranging your entire pantry.
General Tips for Effective Pantry Organization
While grouping and storing your pantry items effectively is key to maintaining an orderly kitchen, there are several overarching strategies that can help you maximize your pantry’s efficiency and ensure everything remains fresh and easy to find. Here are some essential tips to keep in mind:
Label Everything
Use clear, consistent labels on all containers, jars, and shelves. Choose labels that match your kitchen’s decor for a cohesive look. This helps you quickly find what you need and enhances the overall aesthetic of your pantry. It prevents using the wrong ingredients in your recipes and turns functional storage into a visually appealing display.
And don’t forget to scribble down the purchase or expiration date on those labels, especially for bulk items or homemade goods. This practice helps in using older items first and reduces waste.
Maintain an Inventory List
Keep a running list of your pantry contents, including quantities and expiration dates. This can be a physical list attached to the pantry door or a digital list on your phone or computer. Update your list each time you add or remove items from the pantry. This helps keep track of what you have and need to buy, avoiding overstocking.
Check Regularly
Set a regular schedule to go through your pantry. Look for any signs of spoilage, pests, or expired items. During your checks, wipe down shelves and reorganize items if necessary. This keeps your pantry clean and functional.
Rotate Stock
Always use the oldest items first. When unpacking groceries, place newer items at the back and move older items to the front. This rotation ensures that nothing expires unused.
Use Appropriate Containers
Store dry goods like flour, sugar, and grains in airtight containers to preserve freshness and prevent pest infestations.
Use containers of the same size and shape to maximize space and give your pantry a neat, uniform look. Square or rectangular containers often fit better than round ones and look really sleek on the shelf.
Maximize Space and Accessibility
Use shelf organizers, lazy Susans, and tiered shelf inserts to make the most of vertical space and keep everything in plain sight and easy to reach.
Making Your Pantry Work for You!
The way you organize your pantry groups can greatly vary depending on the cooking habits and preferences of your family. It’s important to remember that these groupings are not rigid and can be tailored to better suit your specific culinary routines.
Think about how you like to cook. Are you all about those quick, healthy meals, or are you the master of the slow-cooked feast? Maybe you’re a baking enthusiast who needs various flour and sugars at hand. Identifying your style helps you determine which items should be easiest to grab.
If your family enjoys a variety of ethnic cuisines, consider creating dedicated sections for each type of cuisine. You might organize a section for Italian cooking staples such as pasta, jarred tomato sauces, canned tomatoes, and tubes of tomato and anchovy paste. Similarly, for Asian dishes, group together items like cans of coconut milk, various curry pastes, soy sauce, rice vinegar, and sesame oil.
Your cooking probably changes with the seasons – like fresh salads in the summer and hearty soups when it gets cold. Don’t be afraid to move things around in your pantry to match what you’re cooking. Keep your barbecue spices front and center in the summer, and make sure those baking ingredients are easy to grab when it’s cookie-making time in the winter.
Not everyone has a large, walk-in pantry. Therefore, it’s important to tailor storage solutions to the space available. Consider using your vertical space if you’re working with a smaller space. In this case, stackable bins and over-the-door racks can be your lifesavers. Clear containers are great because they let you see what’s inside without rummaging through everything. Plus, they make even the smallest spaces look neat and organized.
Final Thoughts
Effectively organizing your pantry by categorizing items into common groupings is more than just a neatness strategy—it’s a practical approach to enhancing your culinary workflow and simplifying grocery shopping. Adopting and tailoring these organization techniques to fit your specific cooking and dietary needs will enhance your kitchen’s functionality and simplify the culinary process.
Remember, an organized pantry doesn’t just save time but also reduces waste and stress, allowing you more freedom and creativity to enjoy the art of cooking.
For some cool products to help keep everything neat and tidy, check these out: